Have a look at how easy to use the Ticket Scanner is in this video:
Checking in attendees for in-person events is as easy as opening your smartphone's camera app and aiming it at the QR code on attendees' event tickets. There are several other features you can also take advantage of to make your event check-in go as smoothly as possible.
4. Resend a ticket confirmation email
1. Open the ticket scanner
You can start with any smartphone's camera app and point the camera at the QR code that appears on your event ticket.
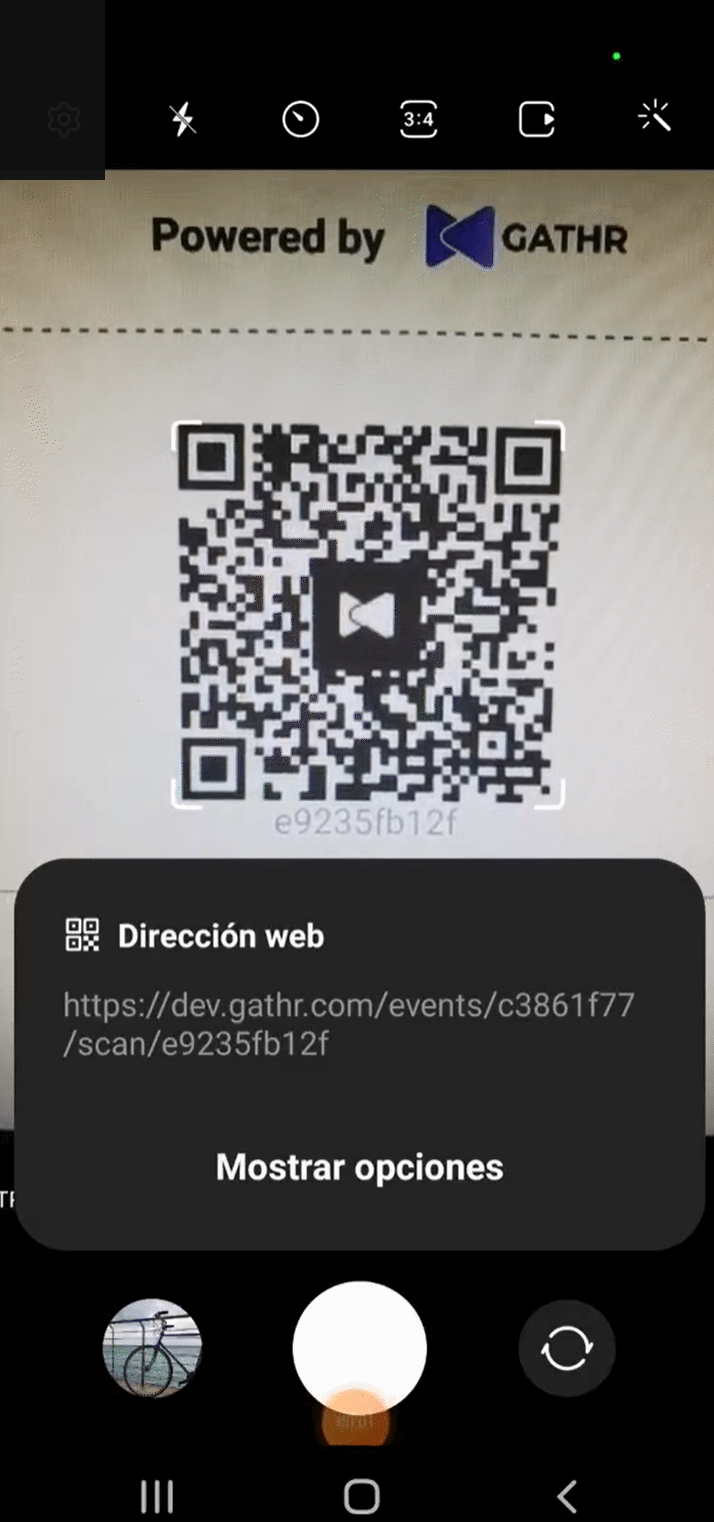
Gathr's ticket scanner integrates with the camera app, and once your camera detects a QR code, a link will appear on your camera app. Select this link.
Note: The link will look similar to this example:
https://gathr.com/events/xxxxxxxx/scan/xxxxxxxx
You can enter your ticket-scanning password at the link or log in to your account as the Host.
Tip: If you are the Event Host and are checking in your guests, follow the instructions to log in.
If you have a team helping you with ticket check-in, distribute your ticket-scanning passcode to them, so each team member can quickly scan tickets for your event - no login necessary.
To locate the passcode, select "Event" on your Dashboard's left sidebar menu, then choose "Manage" from the drop-down menu, then find "Manage Attendees" on the left sidebar menu.
The ticket-scanning password is at the top of the page.

Have your ticket-scanning team enter the ticket-scanning password on their smartphones to scan tickets.
2. Check in an attendee
To check in an attendee, scan the QR code from their ticket confirmation email with a smartphone's camera app, and follow the link that appears. Once you've either logged in or entered the ticket-scanning password, the attendee will appear as checked in on their ticket status page.
After a ticket is scanned, it appears as "checked in" on the ticket status page.
You don't have to worry if you accidentally checked someone in early. You can also undo a ticket check-in from the ticket status page with one tap.
Be sure to offer stamps or wristbands for any attendees asking to leave and re-enter your Event.
The Ticket Scanner only supports a single entry.
3. Fulfill merchandise orders
From the ticket status page, you can also quickly redeem merchandise add-ons your attendees may have purchased when they bought their tickets.
Each add-on product can only be redeemed once - tap "Redeem" to fulfill a product.
You can also undo a product redemption with a single tap.
Within a single order, you can also redeem individual products separately.
4. Resend a ticket confirmation email
If one of your attendees needs help finding their ticket confirmation email, you can resend their tickets to them.
In the Ticket Summary section of the ticket status page, you can resend the original ticket confirmation email to your attendee, should they request it.
5. Refund a ticket purchase
If you need to issue a refund to an attendee, you can do so from the ticket status page.
You can refund the entire order in the Purchase Summary section of the ticket status page.
Track which attendees were scanned in at your Event from your Event Management dashboard in the Manage Attendees tab.
Select Export Attendees to view all your tickets, purchaser data, totals paid, ticket scanning data, and more:
