2. Set up your Recurring Event
4. Live stream Preferences (Virtual Events only)
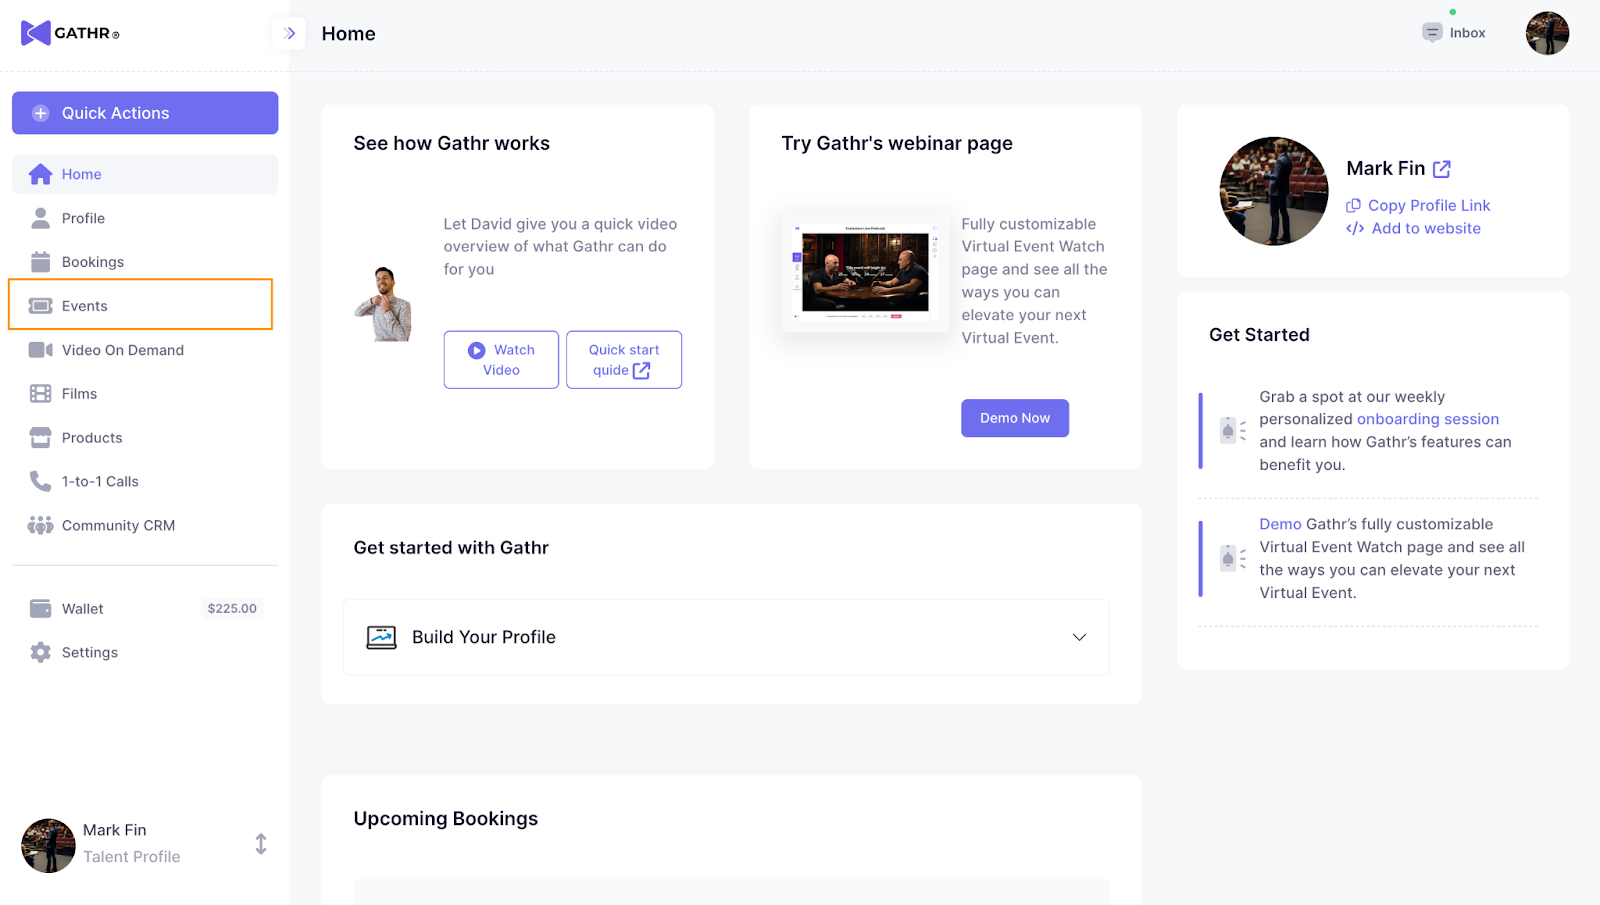
1. Create your Event
Create an Event
On your dashboard, select "Events" from the left sidebar menu.
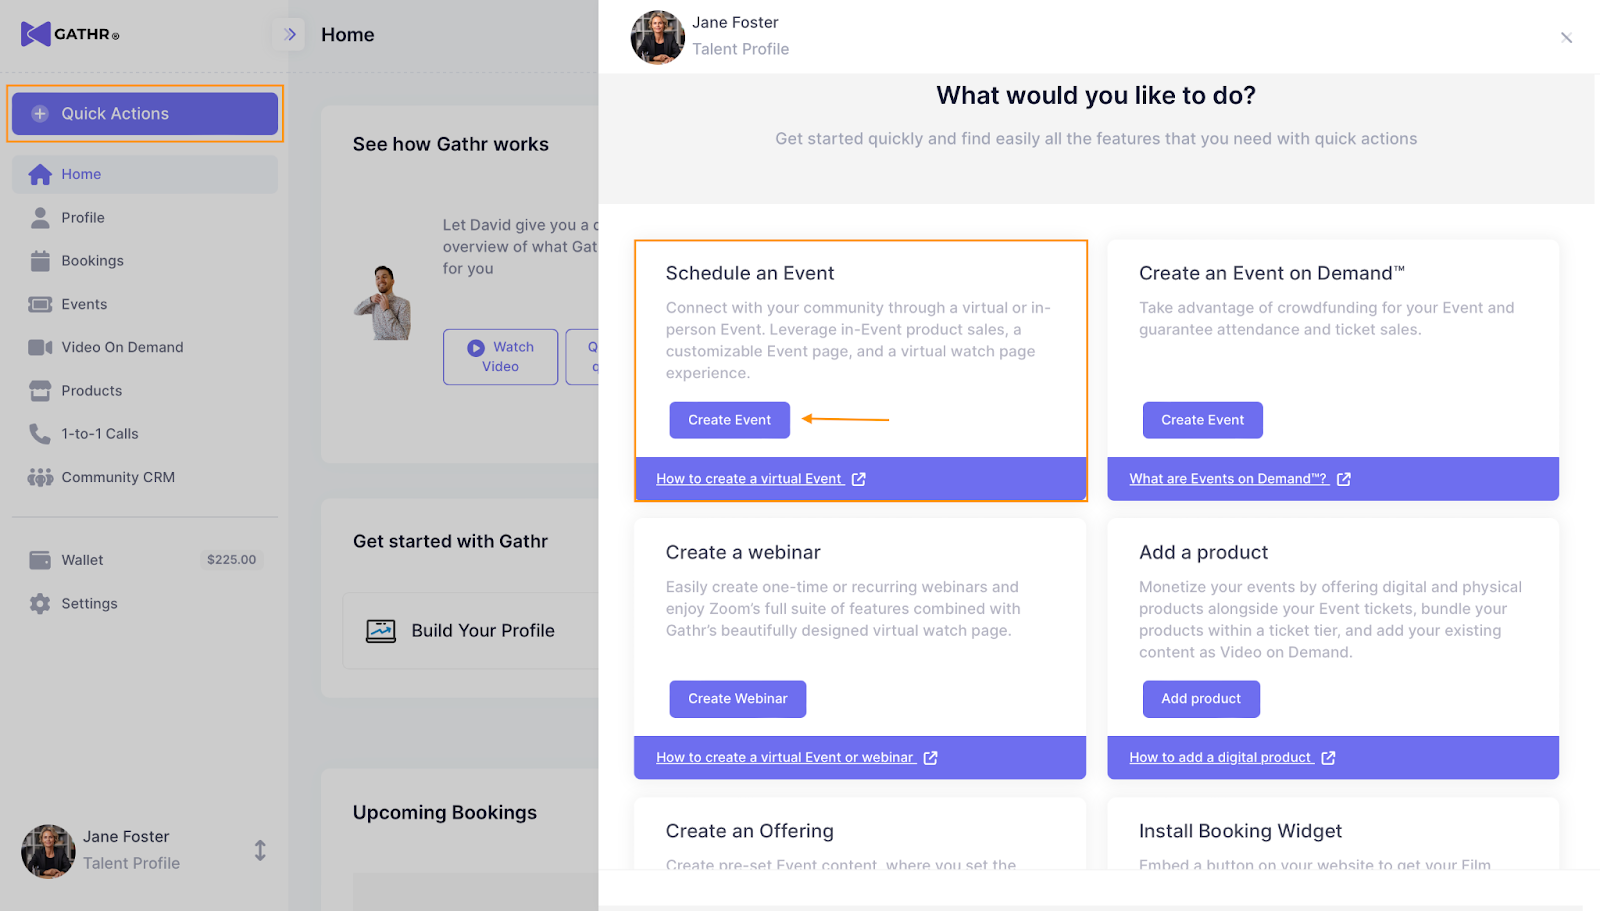
Alternatively, use the "Quick Actions" button and pick "Schedule Event."
2. Set up your Recurring Event
Fill in some basic information about your Event.
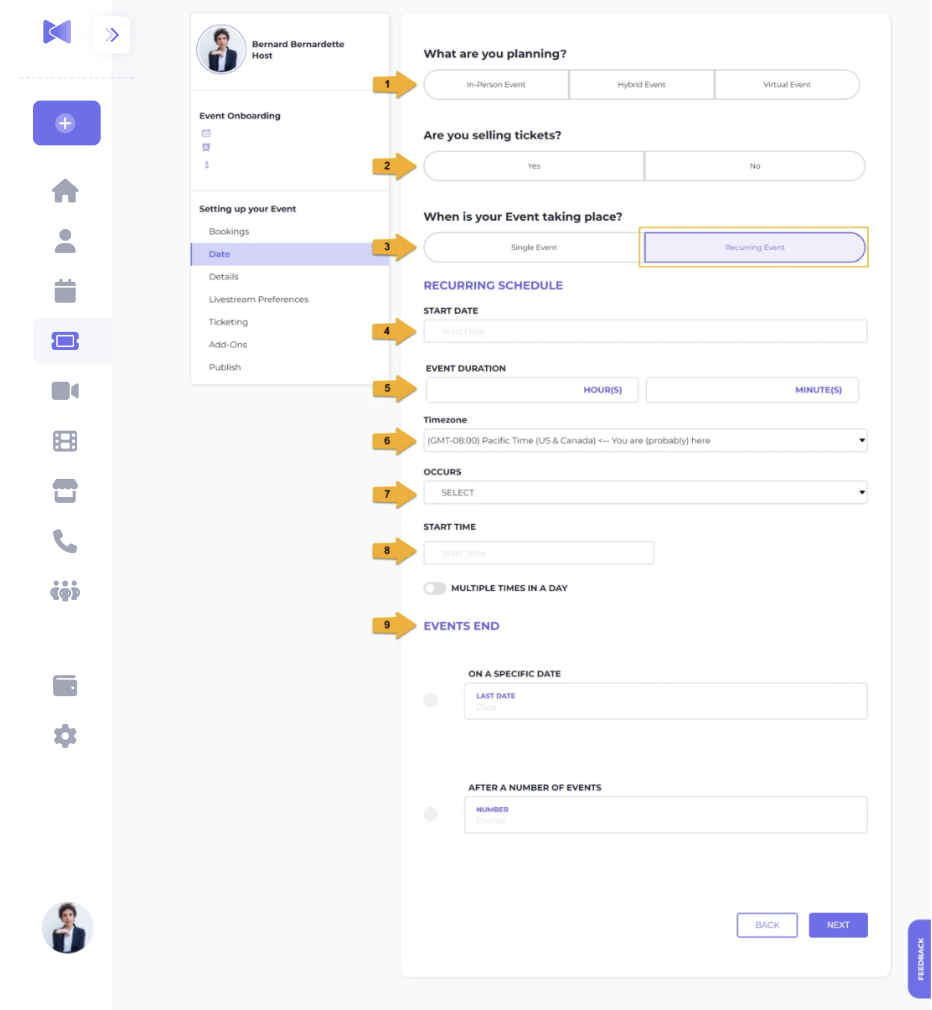
- Event format- Select virtual, in-person, or a Hybrid Event.
- Ticketing - Choose to sell tickets or have a free Event.
- Choose Recurring Event - For repeating classes, workshops, tours, or anything that happens regularly, select Recurring Event.
- Event start date - When will your Event start? Choose the date from the calendar.
- Event duration - How long is your Event? Input the length of your Event. For Events less than one hour long, enter "0" for hours and the correct number of minutes.
- Time zone - Enter your preferred time zone. Usually, this is the same as your current time zone.
Is your audience in another time zone?
If your primary audience is in another time zone, you can select their time zone for your start/end times.
For example, an East Coast-based Yoga Teacher (EST time zone) gives daily online classes to professionals before the workday. However, most of her students are in California (PST time zone).
To simplify things, the Yoga Teacher sets the Event time zone to California time, at 6:00 am PST (knowing it's 9:00 am EST), so her Event schedule matches her students' timetable, and she doesn't have to calculate the time zone conversion when viewing the Event on her Dashboard.
Note - Your Event page displays your Event times in local time, according to the IP address of the Event page visitor.
7. Occurs (frequency) - Select how often your Event will happen.

For multiple Events on the same day, you can select this:

8. Start time - Set what time your Event begins.
This is the start time of each Event Occurrence. For example, if you set your Event start time to 8:00 pm EST, each recurring class, workshop, or seminar will start at 8:00 pm EST.
9. Events end - Choose when your Recurring Events end.
-
- on a particular date
- after your preferred number of Events
This sets the end of your Event Occurrence schedule. For instance, your weekly recurring yoga classes end on December 9th, or your monthly seminars end after 12 Events.
3. Create your Event page
Build interest in your Event by adding a cover photo, title, and other descriptors.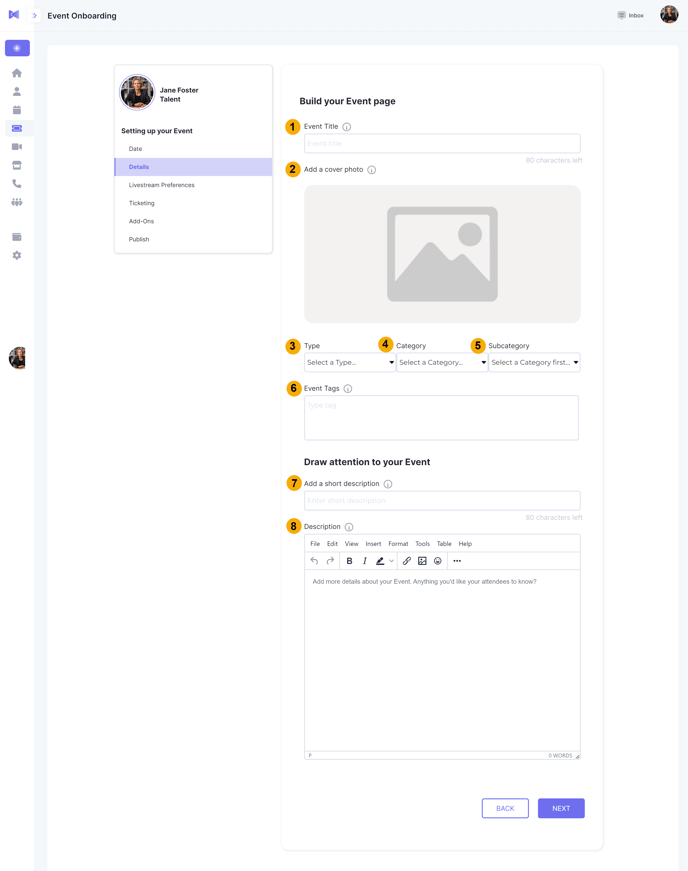
- Event Title- What's your Event called?
- Cover Photo - Add a photo to display on your Event page.
- Event Type - What kind of Event is it? (required)
- Category - Be specific to attract your target audience (required).
- Subcategory - Give your audience an idea of what they're attending (required).
- Event tags - Add keywords to set off your Event in search results (optional).
- Short Description - Give a summary of your Event.
- Description - Give details about the Event you want your audience to know. Here you can add images, links, and basic formatting.
Images resize to fit the space available on the Event Details page.
Your Recurring Event page and each Event Occurrence page will showcase all the exact details you've input when creating your Event page.
Your potential audience lands on your Recurring Event page, where they can select any Event Occurrence dates to purchase tickets for.
4. Livestream Preferences (for virtual and Hybrid Events only)
Shape Attendees' Event experience.
For virtual and Hybrid Events, set your Livestream Preferences:

Choose from these livestream options:
Zoom Meeting
-
- Your audience appears with thumbnail images in a gallery, and you can interact visually and via microphones.
-
- Linking your Zoom account with Gathr takes just a few clicks. Gathr's integration allows you to seamlessly create and edit your Zoom meetings directly from your Dashboard in a snap.
Zoom Webinar
-
- One-to-many presentation style. The Host's camera/screen share is visible, while the audience can interact only via the chat.
- Linking your Zoom account with Gathr takes just a few clicks. Gathr's integration allows you to seamlessly create and edit your Zoom meetings directly from your Dashboard in a snap.
When you link your Zoom account with Gathr, your Event link will be automatically generated and accessible to Attendees in their ticket purchase confirmation emails.
Zoom uses the same URL for each Recurring Event Occurrence.
RTMPS - Broadcast
-
- Stream from the software you choose, such as OBS Studio or Wirecast, or use any other live stream platform, and we'll redirect your Attendees.
-
-
One-to-many presentation style. The Host's camera/screen share is visible, while the audience can interact only via the chat.
-
Other
-
- Use the Gathr Watch page - Take advantage of the Gathr Watch page and embed your YouTube Live or Vimeo Live Event directly onto a beautifully designed and customizable watch page.
-
- Third-Party Platform - Livestream from your preferred platform. Gathr redirects your Attendees to the URL of your choice.
For the Other platform options, you must create separate URLs for each Event Occurrence.
For example, if you are hosting daily dance classes Monday through Friday, you'll need five URLs for your five dance classes
Still trying to decide which format to choose? Discover which Event format is best for you:
5. Add ticket tiers
Name your ticket tiers, and set quantities and prices for each.
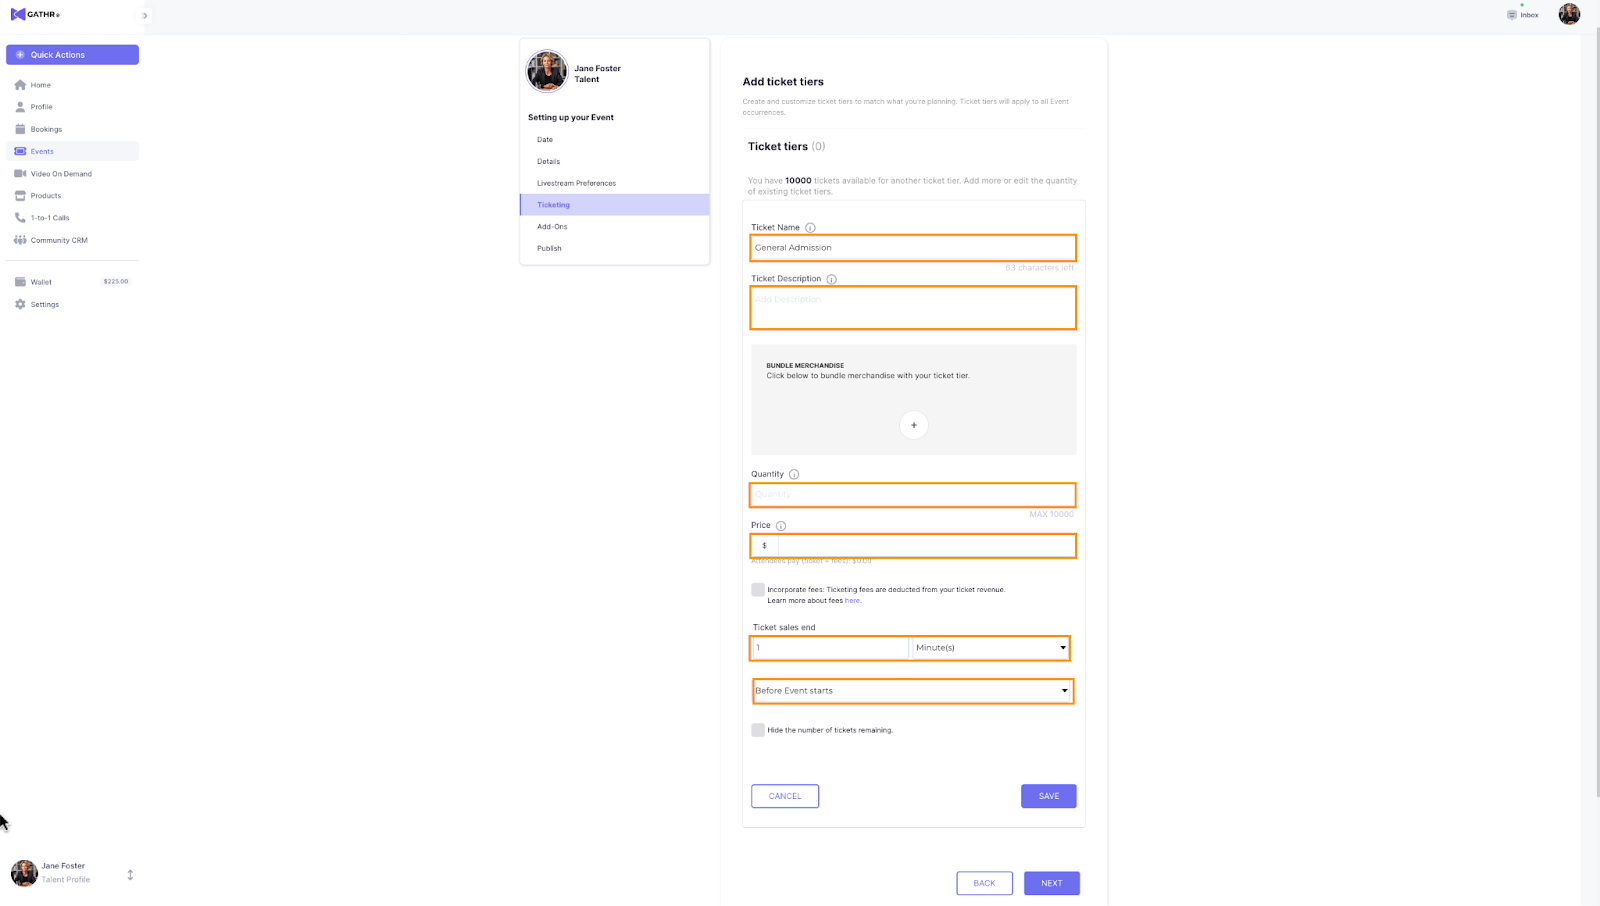
- Name ticket tiers - Attendees are used to seeing different ticket tiers. Some standard ticket tiers are:
-
- General Admission - Regular tickets
- VIP - Offers Attendees something extra for a higher price.
- Early Bird - Offers Attendees a discount for purchasing tickets earlier.
- Student/Senior/Children/Member Price - Offers a discount for Attendees of a specific group.
-
- Set ticketing tiers - add multiple ticket tiers to your Event.
- Set quantity - how many tickets would you like to sell at each tier? (For virtual Events, each Event format has different capacities.)
- Set ticket price (for Paid Events only) - You can see the Attendees' total cost and choose to include fees or not.
- Set ticket sales end times - You can end ticket sales anytime before your Event starts or ends. This is useful for setting up dynamic ticketing.
Examples of dynamic ticket pricing:
-
- Your Event is on December 15, and you decide to offer the following:
- General Admission ($20) from November 1 - 30
- VIP ($50) from October 1 - December 15.
- Last-Minute ($25) from December 1 - 15.
- Your Event is on December 15, and you decide to offer the following:
All ticket tier information you've entered applies to your Event Occurrences. In other words, if you've got a recurring daily meditation class, your Monday class has the same ticketing details as your Thursday class - so do your Tuesday, Wednesday, Friday, Saturday, and Sunday classes.
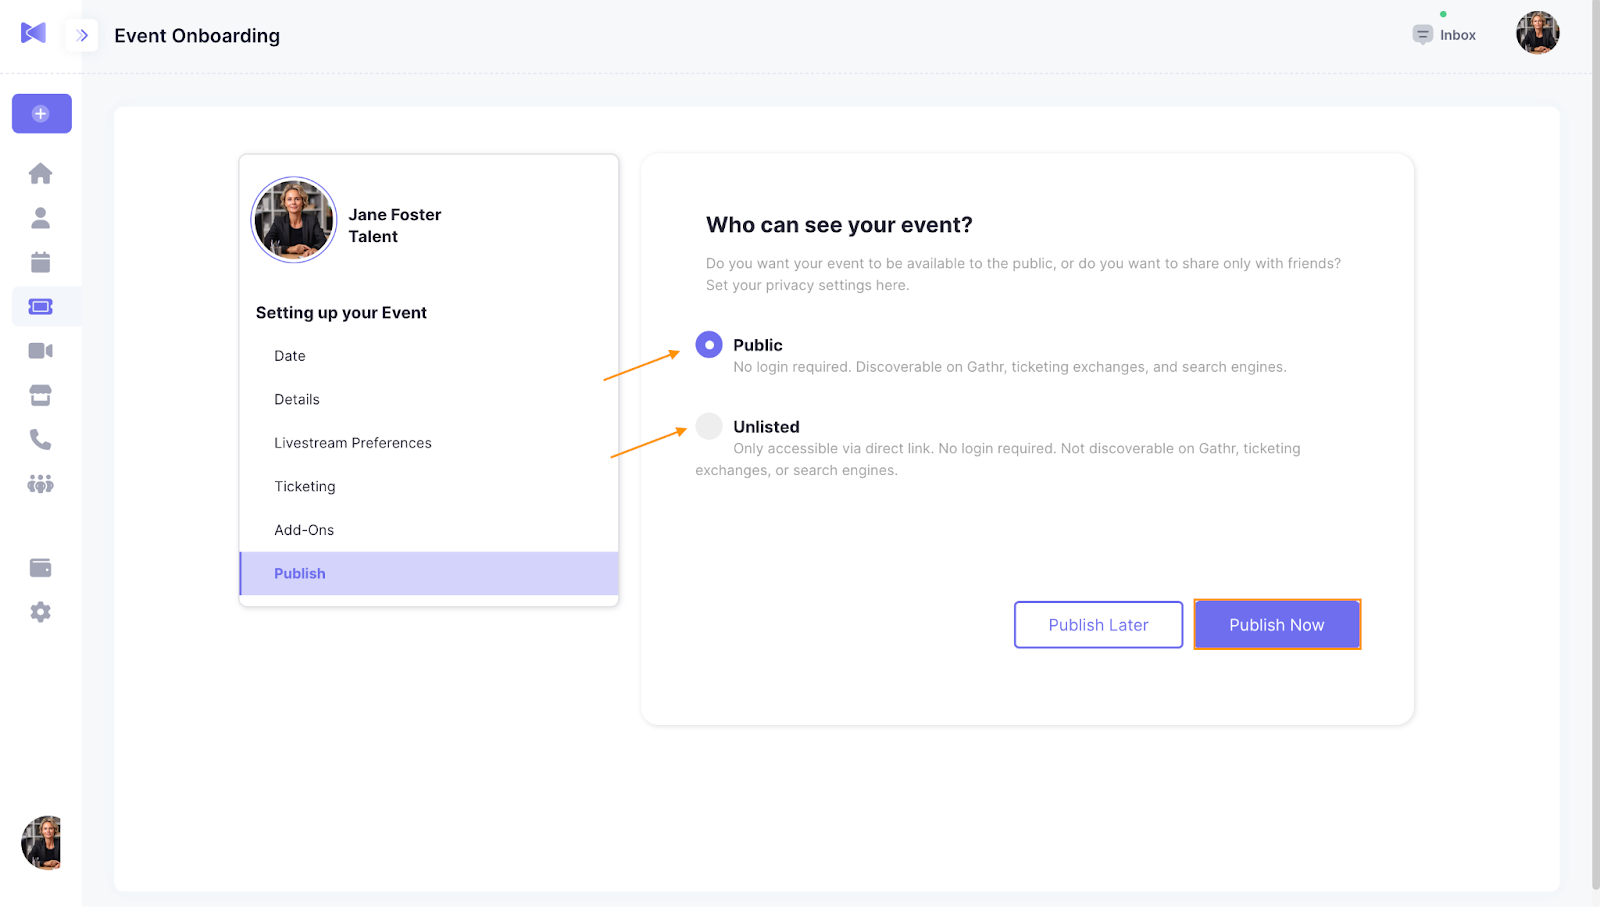
6. Publish your Event
Make your Event Public or Private.